
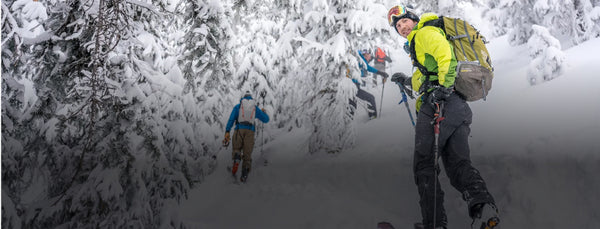

Avalanche Problems? Terrain Is the Answer
There are three factors that come into play with avalanches: weather, snowpack, and terrain.
If we human beings could control the first two, avalanches wouldn’t be an issue, and every day would be a powder day. But, alas, there are some things our big brains just can’t do, which is why, when it comes to avoiding avalanches in the backcountry, the most important thing to focus on is terrain.
Complex terrain in Glacier National Park, where avalanches are only one problem. You must also manage rock fall, glacier travel, and the occasional hungry grizzly bear.
Terrain is the only piece of the avalanche triad that is within your control—you choose where you go. Terrain doesn’t change with the weather or the snowpack, either, which means it’s the only constant in a dynamic environment and is therefore the most reliable piece of information you have in your toolkit. For example, when the avalanche danger increases, you’re unsure about the snowpack, or the weather changes, you can—and should—choose safer terrain.
On most days, it’s a straightforward and simple decision: Keep slope angles lower as avalanche danger rises, and tackle steeper terrain when the danger decreases. But what about those gray-area days when things are less obvious?
TERRAIN COMPONENTS
Slope Angle
Nearly all dry-snow avalanches occur on slopes between 30 and 45 degrees. For reference, 30 to 35 degrees is the steepness of most black-diamond terrain at U.S. ski resorts. Runs from 35 to 40 degrees are usually double blacks, and anything 40-plus degrees falls into the “extreme” category. Depending on avalanche and weak layer type, most avalanche professionals focus on slopes between 35 and 40 degrees, because slopes less than 35 degrees have fewer slides, and slopes steeper than 40 degrees often don’t have slab avalanche problems.
Measure every slope you’re skinning and skiing with an inclinometer. Know the difference between 32 and 36 degrees. That difference is very subtle to the human eye but can have a tremendous impact on avalanche conditions. I use an app called Theodolite to shoot slope angles. I will guess first and then measure, trying to dial in my eye to those subtle terrain changes.

Aspect
What direction does the slope face? Sun and wind dictate avalanche conditions based on aspect. In the northern hemisphere, southerly slopes get more direct sunlight and tend to have fewer weak layers, while northerly slopes lie in the shade and often harbor weak snow near the base of the snowpack. North-facing slopes generally have the best snow and are where we like to ski, so careful assessment of avalanche conditions there is a must.
But what about east and west? East tends to be more like north, while west tends to be more like south aspects. Wind and aspect are related, and you should know where the snow is being taken from (the windward side, or “fetch,” will generally have safer avalanche conditions but less desirable skiing conditions) and where the snow is being deposited (the leeward side). Wind can deposit snow at rates significantly higher than snowfall alone and is a primary contributor to slab formation.
Snow conditions on the shady side are usually far different from those on the sunny side. Tincan Ridge, Turnagain Pass, AK. Photos: Jake Hutchinson
Slope Shape
I look at slope shape a lot—and in two dimensions: vertically and horizontally. In the vertical, is the slope convex, concave, or planar? Convex slopes can be problematic because they suck you in from the top and then expose you to ever steepening terrain. Skiers often get lower than they’d like to be and can’t assess what’s below. Convexities can also be stress points in the snowpack, leading to areas you are more likely to trigger an avalanche.
Concave slopes are steep at the top and mellower near the bottom. They are often easiest to manage and easiest to assess. Additionally, they may offer compressive support of a slab, adding some strength to the snowpack.
Planar slopes—which maintain the same angle, like a tilted book—can be the trickiest, and in a few studies, involve the most human-triggered avalanches. These slopes are so challenging because there are no obvious stress or trigger points to avoid, and the consistent steepness may lead to triggering a slide from anywhere on the slope.
It’s also important to always look at what’s above you—overhead hazards include cornices, loose rocks, or steep avalanche-prone terrain that puts you directly in an avalanche path. Remember that an avalanche’s runout can be long, and just because you’re on flat terrain does not mean you’re out of harm’s way.

Even if a path has slid doesn't mean that other connected areas are automatically safe. Know what is above your head.
In the horizontal dimension, I look at similar things. Am I entering a bowl that may have multiple aspects? Is the slope planar, with equal exposure? Does it channel into a gully, over a cliff, or into dense trees? As some avalanche victims die of trauma, it’s important to ask yourself what the consequences are of getting in an avalanche at any point. Will I be carried into rocks or trees? Am I above a cliff or a narrow gully where a deep burial becomes very likely?
USING TERRAIN TO YOUR ADVANTAGE
It’s best to evaluate terrain on both the macro and micro scales. Depending on the avalanche problems, micro and macro terrain take different priorities. If you are dealing with large avalanches running long distances, micro terrain probably has little effect on your safety or ability to travel. With smaller, more manageable avalanche conditions, micro terrain can make the difference between a fun day in the mountains and a disaster.
You need to assess the overall avalanche path and terrain as a whole, then break it down into smaller pieces that can be effectively managed. In big terrain, this becomes even more important. You may not be able to completely remove your exposure to avalanche danger, but you can minimize exposure by using micro terrain features (small ridges, rock outcrops, terrain bends and undulations) to your advantage.
Big Bend avalanche paths in Glacier National Park. There is no way to completely eliminate avalanche exposure to attain the ridge above, but by using the micro terrain and understanding specific avalanche conditions, it can be safely ascended in most conditions.
Macro Scale
Macro scale is the big picture. Use all the factors I spoke about above to decide the size of the avalanche path and its consequences. Is it an entire mountain face that could slide, or a small, well-defined avalanche path that is easily avoided?
Micro Scale
On a micro scale, you will want to think about how and where smaller avalanches will run, using small features as protection from sliding snow above. If it’s spring, I look for cooler, shady slopes to avoid sun-heated slopes with potential for wet slides. In the colder months, when persistent weak layers are more likely, I stay on the sunny side—especially early in the morning when it’s frozen. I try to imagine how snow would flow downhill and how I can use terrain features to protect me and minimize exposure. This works in both the uphill and downhill modes. When I stop, I prefer to be under protective features as opposed to above them. I try to stay out of what I imagine the target zone to be.
Exposure
As a rule, humans are fragile and poorly designed to survive the physical environment around us. Thankfully, we are gifted with large brains and the ability to assess and avoid danger. When I look at exposure, I keep in mind that I move uphill much slower than downhill, so I adjust my travel accordingly. It’s also important to remember that you have much less ability to evade even a small avalanche when your heels are free and your skins are on.
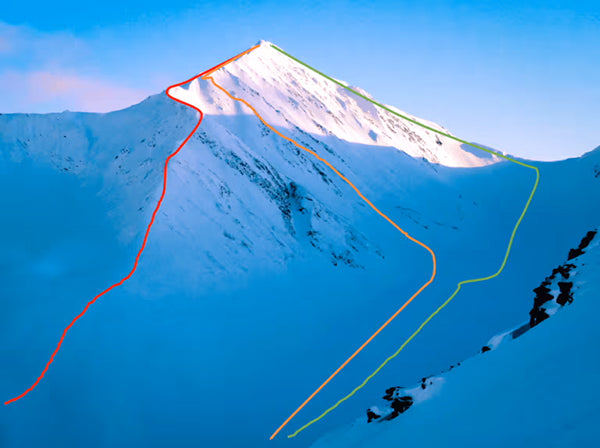
Complex avalanche terrain, where the entire mountain face could slide as a whole, or each individual terrain feature could potentially avalanche by itself. As a general rule, ridges are your friend. They may be large and obvious (red line) or subtler (orange) and offer protection from the smaller avalanche features. While the green line offers an overall lower angle of travel, you are exposed to the entire face from above for a very long time.
THE BIG TAKEAWAYS
Constantly assess terrain, think about the different avalanche problems and how they would move through the terrain differently. In certain avalanche conditions, there may be no safe options, and choosing a different location altogether is the answer.
Think in the moment: What am I currently exposed to and how do I mitigate it? If you’re presently in a small terrain feature, you need to consider that you also may be on a large mountainside that may have other problems.
Finally, remember that the mountain and snow are indifferent to us being there. We have to play by their rules, and the decisions are ours alone.
--
Article by Jake Hutchinson
Jake has spent more than 25 years working as an avalanche professional. He is currently a lead instructor for the American Avalanche Institute, an avalanche dog handler and trainer, and an avalanche safety consultant to the resort and rescue communities. Off the snow, Hutchinson is a Certified Instructor and former Head of Instructor and Seminar Development for Gym Jones in Salt Lake City. He is currently involved in private personal training with an emphasis on high level functional fitness for mountain and military athletes.
